Switchboard Quickstart Guide
Let’s go through a simple pipeline that pulls a data file from Amazon S3, applies a simple data transformation, and uploads the transformed result back to Amazon S3.
Prerequisites
Before you begin, ensure you have:
- Amazon AWS IAM Key/Secret Pair
- Bucket Path
- File Path
Getting Started
To start using Switchboard, you need to:
Add Credentials to the System
To add a new Amazon AWS IAM Key/Secret Pair:
- Log in to the Dashboard.
- From the left pane, click on the Keys tab.
- In the Keys window, click

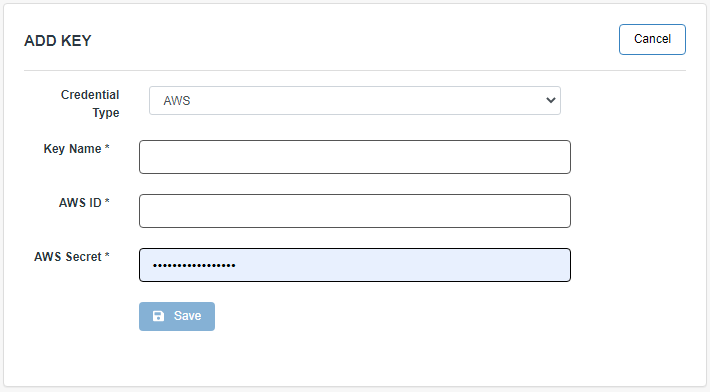
- In the Add Key window, select AWS from the Credential Type drop-down.
- Enter the Key Name, AWS ID, and AWS Secret.
- Click Save to add the key to the system.

This key can now be used in the AWS recipe.
Note: The Amazon AWS IAM Key/Secret Pair must have read access to the source bucket.
Draft a Recipe
To draft a recipe:
- Navigate to Scripts and select Drafts.
- Click
 .
. - The Draft Editor opens where you can draft new recipes.
Navigating the Draft Editor
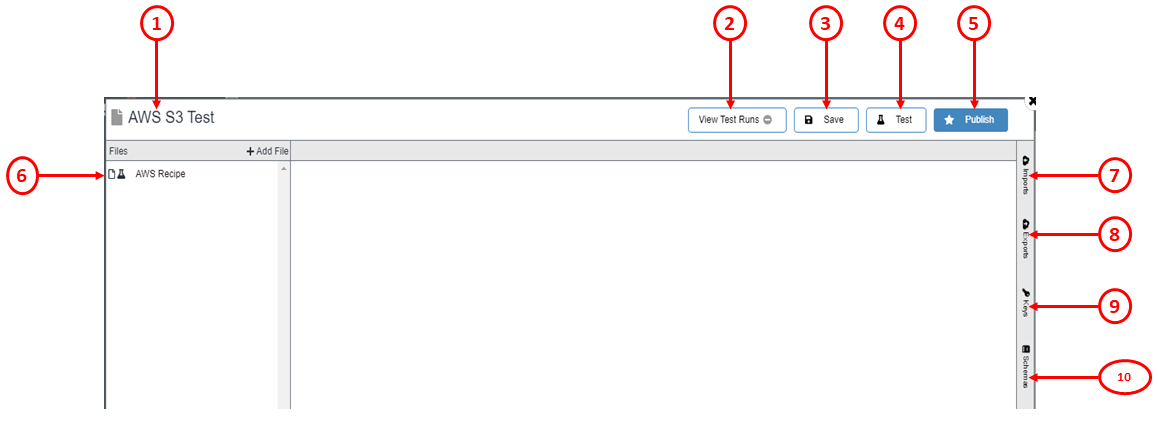
The Draft Editor displays all the recipes.

- Draft Name - The name of the draft.
- View Test Runs - Allows to view the test results
- Save - Allows to save the recipe in the draft.
- Test - Allows to test the recipe. You can test the recipe with existing or new downloads.
- Publish - Publish the recipe
- Files - Displays all the recipes available in the draft.
- Imports - The names of all recipe imports in your account.
- Exports - The names of all recipe exports in your account.
- Keys - The names of available credentials in your account.
- Schemas - A set of pre-defined schemas that can be used in your recipes.
Create a data pipeline
To create a data pipeline to connect a file in AWS S3 to a table in Google BigQuery:
- Setup an Import
- Setup an Export
- Add the Test Destination
- Add a data transformation to the pipeline
- Publish your Script
Setup an Import
The import statement defines the data we want to download. In this case, the type of download is s3_ng, which is Switchboard’s import type for files stored on S3.
There can be many different files stored in an S3 bucket. To notify Switchboard which files to choose, use the pattern parameter. In this case, our recipe notifies Switchboard to only look for the file test.csv. To match everything in the bucket, use the wildcard s3://my_s3_bucket/.
Switchboard supports a lot of other patterns. For more information on Specifying Patterns, see the Amazon S3 Connector.
Since CSV files do not provide their own schema, we need to provide Switchboard the name and type of each column in the using block. The test.csv file contains 3 columns: name, date, and value. We’ve defined their datatypes below. In addition, Switchboard adds the filename to S3 imports automatically.
Syntax:
import my_csv_from_s3 from {
    type: "s3_ng";
    pattern: "s3://my_s3_bucket/test.csv";
    key: "aws_key";
} using {
    filename: string;
    name: string;
    date: datetime;
    value: integer;
};
Setup an Export
The Export statement describes where and how data should be exported. Switchboard can support a number of file formats. In this case, we want a CSV format that is compressed with gzip. The headers parameter (which can either be true or false) notifies Switchboard to include a row of column names at the top of the file. If you want to split a large file up into pieces, use the partition_count parameter and tell Switchboard how many pieces to use. In this case, we just want one file, so this is set to 1.
Syntax:
export my_transformed_csv_data to {
    type: "s3_ng";
    destination: "s3://my_s3_bucket/my_export_file.csv.gz";
    key: "aws_key";

    headers: true;
    format: "csv";
    compression: "gzip";
    partition_count: 1;
 };
Add the Test Destination
To test a project, provide a test destination where the exported data will be sent. In the export block, add the following: test_destination: “test_file_path”;. The export block will now look like this:
Syntax:
export my_transformed_csv_data to {
    type: "s3_ng";
    destination: "s3://my_s3_bucket/my_export_file.csv.gz";
    key: "aws_key";

    headers: true;
    format: "csv";
    compression: "gzip";
    partition_count: 1;

    test_destination: "s3://my_s3_bucket/my_export_file.csv.gz";
};
Add a data transformation to the pipeline
To transform the data along the way, we will now add a transformation step. Let’s add a new column to our source data, which will add a timestamp when the data is processed by Switchboard. The syntax is quite similar to an SQL statement:
Syntax:
table my_transformed_csv_data is
    select
        name,
        date,
        value,
        processing_datetime() as processed_timestamp
from my_csv_from_s3;
Here, we are creating a table called my_transformed_csv_data from the source data:
- selecting all the columns and
- adding a new column called processed_timestamp. This new column is generated by Switchboard using the built-in processing_datetime function.
Publish your Script
Once you are satisfied with your Switchboard Script, click  . Your recipe will run immediately.